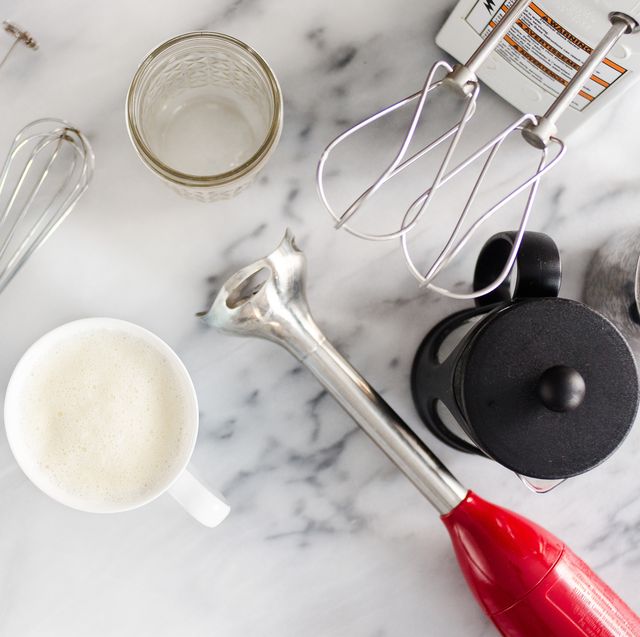
Froth Milk With an Immersion Blender: Creamy Tips!
To froth milk with an immersion blender, submerge the whisk attachment just below the milk’s surface and blend. Use a high-sided container to prevent splashing as you create foam.
Creating the perfect froth at home doesn’t require professional equipment; an immersion blender can easily whip up smooth, creamy froth for your coffee. This handy kitchen tool, often used for pureeing soups and sauces, proves versatile enough to handle milk frothing as well.
By mastering the immersion blender technique, you can elevate your home café experience with barista-level drinks. Ensuring your milk is cold and choosing the right container will help achieve optimal frothiness. With controlled pulsing and proper positioning of the blender, even dairy alternatives like almond or soy milk can reach a desirable level of froth for your lattes and cappuccinos. Unlock the potential of your immersion blender and treat yourself to indulgent, foamy beverages with ease.
The Basics Of Milk Frothing
Frothing milk transforms your everyday coffee into a creamy delight. It’s about introducing air into the milk, creating a foamy texture that adds luxury to every sip. Whether it’s a cappuccino or latte, the right froth can make all the difference.
Why Froth Milk?
- Enhances flavor: Frothy milk takes your coffee to the next level.
- Improves texture: It adds a creamy and smooth experience.
- Visual appeal: Froth gives drinks a professional look.
Tools You’ll Need: Immersion Blenders
To froth milk using an immersion blender, you will need:
- A tall container to prevent splashing.
- An immersion blender.
- Milk of your choice.
Tip: Choose a container slightly wider than the blender head to allow for optimal movement and air incorporation.
:max_bytes(150000):strip_icc()/fw-immersion-blender-kevin-norris-tout-dcc789d03505476b978ebd14701ef4ec.jpg)
Credit: www.foodandwine.com
Before You Begin: Preparing Your Milk
Get ready to enjoy a coffeehouse experience at home! Preparing your milk is a simple step but crucial for perfect froth. Achieve that dreamy, creamy consistency with an immersion blender using these tips. Let’s dive into selecting milk and heating it up!
Choosing The Right Milk
The type of milk you choose can make all the difference. Consider these points:
- Whole milk gives a richer texture.
- Use low-fat or non-fat for stiffer, longer-lasting foam.
- Plant-based milks like almond, soy, and oat work well.
- Barista editions are designed for better frothing.
Experiment with different types to find your favorite froth!
Temperature Matters: Preheating Your Milk
Heat is essential for good froth. Here’s how to do it right:
- Start with cold milk from the fridge.
- Heat gently to 150°F to 155°F (65°C to 68°C).
- Use a thermometer or stop heating when the milk is hot to the touch but not boiling.
- Avoid overheating to maintain taste and texture.
Preheated milk ensures a smooth, even froth with your immersion blender.
Step-by-step Guide To Frothing With An Immersion Blender
Welcome to the ultimate guide on frothing milk with an immersion blender!
Frothy milk is the crown of a great coffee. Many think it’s hard to achieve at home. But, it’s easy with the right tools. An immersion blender can create that perfect froth. Let’s dive into the steps to create creamy, rich foam for your favorite beverages.
Setting Up Your Blender
First, ensure your immersion blender is clean. Check if it’s working well. Then, gather these things:
- Immersion blender
- Milk of choice (whole milk froths best)
- Tall container to prevent splashes
Now, pour the milk into the container. Fill it only halfway. This gives the milk room to froth.
The Frothing Process
- Plug in your blender. Submerge it in the milk.
- Turn on the blender. Use the lowest speed setting.
- Move the blender up and down slowly. This introduces air and creates foam.
Froth for 20-30 seconds or until desired foam level is achieved. Remember, gentle moves create the best foam. Do not over-froth as it may make the milk too stiff.
Achieving The Perfect Foam
For the perfect foam, temperature plays a big part. Aim for 140-155°F (60-68°C). Use a kitchen thermometer to check. Here are tips for the best foam:
- Use fresh milk for more stiffness.
- Cold milk froths better.
- Keep the blender’s tip just below the milk surface.
- Clean your blender after each use.
Aim for creamy foam that’s thick yet pourable. It makes coffee drinks irresistible. Enjoy the art of coffee making right at home!
Advanced Techniques For Enhanced Froth
Are you ready to take your home barista skills to the next level? Perfecting milk froth can transform your coffee experience. Below are expert tips for creating that creamy, dreamy froth using an immersion blender. Get ready to impress with these advanced techniques!
Incorporating Cream For Richness
Adding cream can elevate your froth game. Start with cold milk and a dash of cream. The cold temperature helps in creating stability in the froth. Look for a high-fat cream; this adds body and richness to your froth. Combine these in a deep container, making sure the immersion blender’s head is submerged to avoid splatters. Blend on a low setting initially, then increase speed to introduce more air, which results in a thicker froth. Aim for a creamy consistency that holds its shape but still pours smoothly.
- Chill milk and cream before blending.
- Blend on low, then increase speed.
- Look for consistency that can hold a peak.
Adding Flavors To Your Froth
Flavorful froth can add an exciting twist to your beverages. Introduce flavors like vanilla, cinnamon, or honey. For a touch of sweetness and flair, mix in a teaspoon of your chosen flavor to the milk mixture before blending. Vanilla bean paste offers a rich taste, while cinnamon brings warmth. Honey is perfect for a smooth sweetener that complements the natural flavors of coffee.
| Flavor | Quantity | Best Paired With |
|---|---|---|
| Vanilla | 1 teaspoon | Latte, Cappuccino |
| Cinnamon | 1/2 teaspoon | Hot Chocolate, Mocha |
| Honey | 1 teaspoon | Tea Latte, Chai |
To infuse the flavors evenly, add them before frothing. Begin with a gentle mix. As you froth, the immersion blender will distribute the flavor throughout the milk. Taste your froth, and adjust the flavoring as needed.
- Add flavors to the milk mix pre-froth.
- Start mixing gently, then froth.
- Adjust flavors to taste.
Troubleshooting Common Frothing Problems
Perfecting milk froth with an immersion blender can be tricky. Yet, the silky smooth layer atop your coffee is worth the effort. Don’t let froth challenges deflate your barista dreams. Instead, explore how to tackle the too much froth or the under-frothing blues. Get ready to turn any froth fail into a foam-filled victory!
Dealing With Too Much Froth
Sometimes, enthusiasm leads to an abundance of froth. Don’t worry – it’s fixable. Here’s a quick guide:
- Reduce the speed: A slower pace can prevent over-frothing.
- Shorten the time: Limit the frothing duration for less volume.
- Adjust milk type: Switch to a milk with lower fat content for finer froth.
Remember, aim for a creamy consistency. It should not overflow or become too stiff.
Solving Under-frothing Issues
At times, milk just won’t froth up. Before you give up, consider these quick fixes:
- Check temperature: Warm milk to the ideal frothing range, usually between 150°F and 155°F.
- Use fresh milk: The fresher, the better. Stale milk rarely foams well.
- Gauge container size: A tall, narrow jug can help build froth.
- Inspect blender positioning: Insert the blender just below the surface; this introduces the right amount of air.
Get a velvety dollop that crowns your coffee by fine-tuning these four factors.

Credit: www.kitchenaid.com
Cleaning And Maintenance
A silky smooth layer of frothed milk can transform an average cup of coffee into a luxurious treat. Yet, to continue enjoying this blissful addition to your beverages,proper cleaning and maintenance of your immersion blender is key. Below are the steps to ensure your blender remains in pristine condition, always ready for your next frothy creation.
Post-frothing Clean-up
After indulging in your creamy concoction, a quick clean is crucial.
- Detach the blender’s whisk or frother attachment.
- Rinse it under warm water, removing milk residues.
- For stubborn spots, use a mild detergent and a soft sponge.
- Pat the attachment dry before reassembling your device.
Keeping Your Blender In Top Condition
Longevity of your immersion blender rests on routine upkeep.
- Regularly inspect your blender for wear and tear.
- Store your blender in a dry place away from direct sunlight.
- Sharpen or replace blades as needed to maintain efficiency.
By following these simple cleaning and maintenance steps, you’ll ensure that your immersion blender continues to create perfect froth for your favorite drinks.

Credit: www.amazon.com
Frequently Asked Questions For Froth Milk With An Immersion Blender
Can You Froth Milk Using An Immersion Blender?
Absolutely. To froth milk, submerge the immersion blender’s whisk attachment just below the milk’s surface. Turn it on a low setting at first, gradually increasing speed to create a rich, creamy froth.
How Long Does It Take To Froth Milk With A Blender?
Generally, frothing milk with an immersion blender takes about 30 seconds. Keep the blender in motion to introduce air evenly and create a consistent froth. Stop once you’ve achieved the desired foaminess.
What Is The Best Milk For Frothing With Immersion Blenders?
Full-fat or whole milk is ideal for frothing with an immersion blender as it creates a richer, thicker foam. However, lower-fat milks and non-dairy alternatives like almond or oat milk can also be frothed effectively.
Can I Froth Cold Milk With An Immersion Blender?
Yes, cold milk can be frothed using an immersion blender. It may take slightly longer than warm milk, and the froth is typically less dense, making it perfect for iced coffee beverages.
Conclusion
Transforming milk into creamy froth at home is a breeze with an immersion blender. Perfect for coffee enthusiasts, it’s a quick, affordable solution. So, gather your immersion blender and elevate your next cup. Delicious, barista-style beverages are just a blend away—experiment, enjoy, and impress!